Intelligent OTA: Host MCU Images Tab
This tab is used to monitor the OTA status of existing Host MCU images, create new images for OTA deployments, and edit existing images using the Ayla Customer Dashboard.
Ayla OTA images consists of either Ayla firmware or OEM host MCU images. The Ayla firmware images are Ayla-supplied Production Agent (Black Box). In the Ayla Customer Dashboard, Ayla images are read-only (so cannot be modified) and are part of the Ayla module that you can select when configuring OTA jobs.
OEM Host software images (referred to as Host MCU images) are firmware images that will be applied on the Host MCU and are developed by or for the OEM. This includes the firmware image that comes with the Ayla Integrated Agent (White Box).
Following are the steps to complete all OTA features available on this tab:
You can accomplish the following with Ayla's Intelligent OTA:
- Log in to the Ayla Customer Dashboard using your current log-in credentials.
|
NOTE |
These are the credentials you set up to register for a developer’s account. If you have not done this, refer to the Ayla Developer’s Portal User’s Guide, AY006UDP3 on Ayla Connection. |
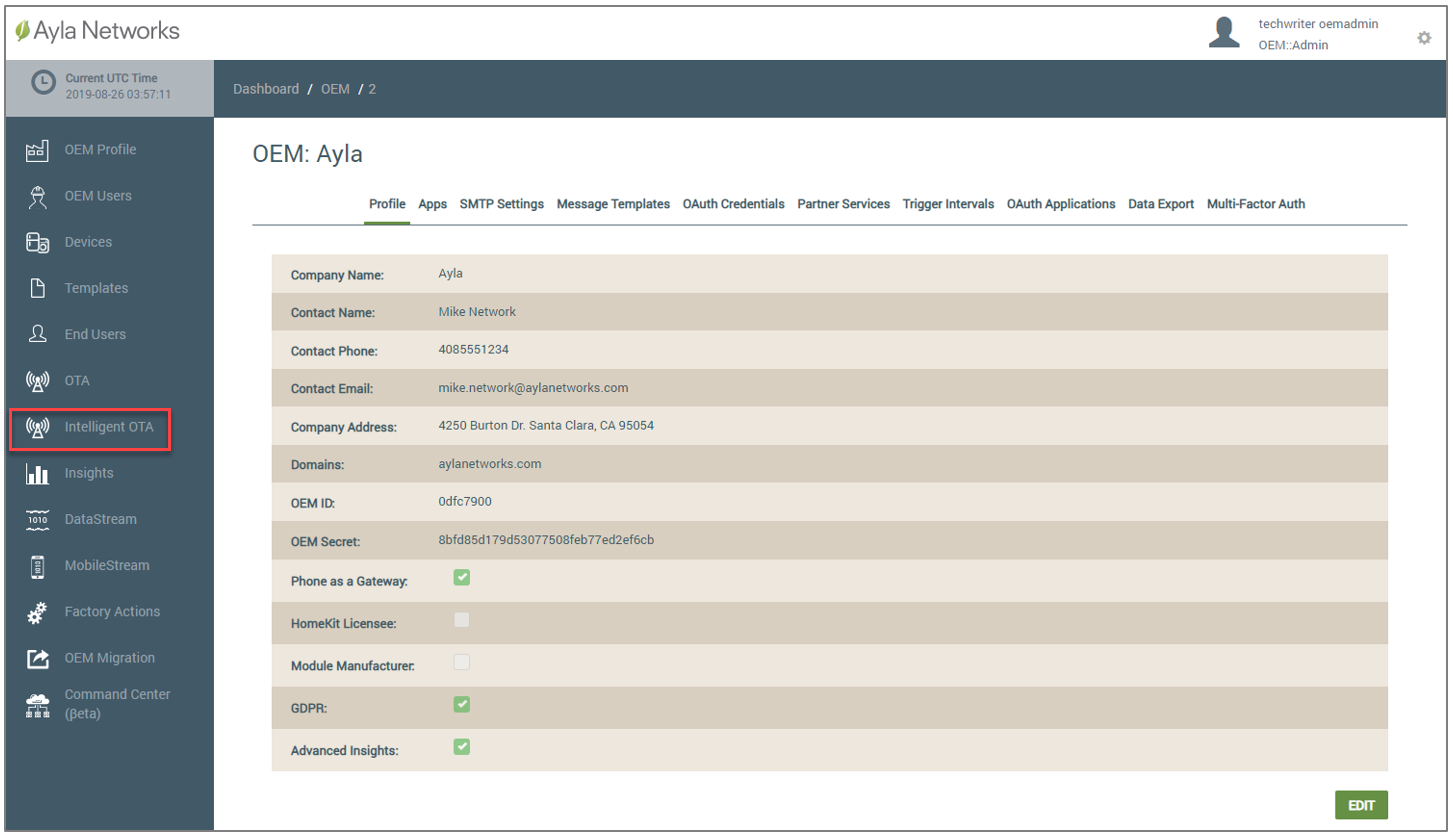
- Click Intelligent OTA in the navigation panel (on the left side of the dashboard), as shown below:
- In the drop-down for OEM Model (shown below), select the OEM model from the list. These are the model numbers of the OEM’s host application board, which are extracted from each Ayla template associated with your OEM admin role.

|
NOTE |
Only OEM admins and OEM support managers are allowed to execute OTA Host jobs in the Ayla Customer Dashboard. Refer to the following topics for more information on Ayla Roles and Templates: Ayla Default User Roles, User Roles for Access to Factory Actions, Ayla Platform OEM Types, and Ayla Templates. |
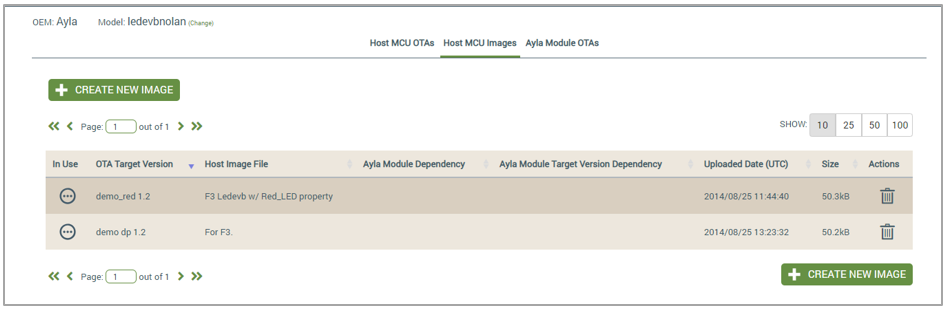
- Click the Host MCU Images tab located at the top of the OTA landing page, as shown below.

- Use the table on this tab to review and monitor information on existing images for the selected OTA model, as shown below:
|
NOTE |
You can click the column heading to sort the information in that column (including OTA Target Version, Host Image File, Ayla Module Dependency, Ayla Module Target Version Dependency, and Uploaded Date). |
Following are descriptions of the information available in this table of existing Host MCU Images on the Host MCU Images table:
- In Use
 - Indicates that the image is not included in any active OTA.
 - Indicates that the image is included in an active OTA for one or more OEMs/ OEM Models.
- OTA Target Version
The firmware version of the image that was uploaded for migration via this OTA update.
- Host Image File
The file name of the firmware image on the Ayla Module that is assigned to the OTA update about to be migrated to the field.
- Ayla Module Dependency
This is the Ayla module firmware image that came with the Ayla device(s) which should receive this OTA update. Specifying the Ayla module dependency is important because the module may be changed over the lifecycle of a device.
|
NOTE |
The Ayla platform filters out all other modules except for the one you selected for Ayla Module Dependency, and then deploys the OTA update only to the devices with that particular Ayla module. This is an efficient way to send firmware updates to select devices. |
- Ayla Module Target Version Dependency
The Ayla firmware release/version that will be sent to devices via the OTA update.
- Uploaded Date (UTC)
The date/time (in Coordinated Universal Time) that the Host image file was uploaded to the dashboard.
- Size
The size of the image.
- Actions
 - Used to delete the Host MCU image. A confirmation message box displays to make sure that you wish to delete the image from the system.
When you create a new Host MCU image in the Ayla Customer Dashboard, you are configuring an image profile. You can modify this profile as explained under Edit Existing Host MCU Images, but you cannot completely change it.
|
NOTE |
You can create a new firmware image for the Ayla Integrated Agent (White Box) in the Ayla Customer Dashboard. |
- Log in to the Ayla Customer Dashboard using your current log-in credentials.
|
NOTE |
These are the credentials you set up to register for a developer’s account. If you have not done this, refer to the Ayla Developer’s Portal User’s Guide, AY006UDP3 on Ayla Connection. |
- Click Intelligent OTA in the navigation panel (on the left side of the dashboard), as shown below:
- In the drop-down for OEM Model (shown below), select the OEM model from the list. These are the model numbers of the OEM’s host application board, which are extracted from each Ayla template associated with your OEM admin role.
- Click the Host MCU Images tab located at the top of the OTA landing page, as shown below.
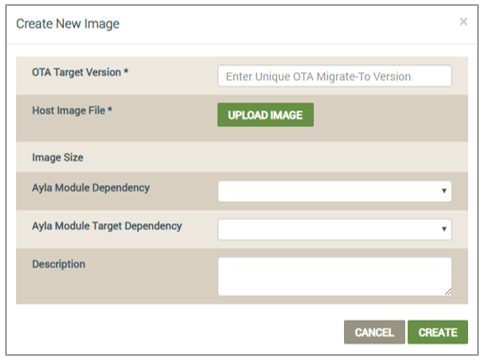
- Click the CREATE NEW IMAGE button to open the Create New Image dialog box, shown below:
|
NOTE |
Fields with an asterisk (*) are mandatory to complete the configuration. The other fields are optional; therefore, leaving them blank does not have any effect. |
- For OTA Target Version (mandatory), type the name/firmware version of the image that you are uploading for the OTA update.
- For Host Image File (mandatory), click the UPLOAD IMAGE button to navigate to and upload the Host MCU image file.
|
NOTE |
Image Size displays the size of the Host MCU image file once it is uploaded. |
- For Ayla Module Dependency (optional), select the Ayla module that has the firmware that came with the Ayla device(s) which should receive this OTA update. Specifying the Ayla module dependency is important because the module may be changed over the lifecycle of a device.
|
NOTE |
The Ayla platform filters out all other modules except for the one you selected for Ayla Module Dependency, and then deploys the OTA update only to the devices with that particular Ayla module. This is an efficient way to send firmware updates to select devices. |
- For Ayla Module Target Dependency (optional), select the Ayla module firmware release/version to send to devices via this OTA update.
|
NOTE |
If you configure Ayla Module Dependency (in Step 8), you must also enter the version of the Ayla module firmware to deploy to those devices in the Ayla Module Target Dependency field. |
- For Description (optional), type information on this Host MCU image for OTA migration, for example, “this is the software to update the ATM module from version 1.2 to 1.3.2.”
- Click the CREATE button to add this host MCU image to the list of images that can be used in OTA updates. Or, click the CANCEL button to close this dialog box without saving.
You can modify the image profile that you created (refer to Create New Host Images), but you cannot change everything in the profile, as described in the steps below.
- Log in to the Ayla Customer Dashboard using your current log-in credentials.
|
NOTE |
These are the credentials you set up to register for a developer’s account. If you have not done this, refer to the Ayla Developer’s Portal User’s Guide, AY006UDP3 on Ayla Connection. |
- Click Intelligent OTA in the navigation panel (on the left side of the dashboard), as shown below:
- In the drop-down for OEM Model (shown below), select the OEM model from the list. These are the model numbers of the OEM’s host application board, which are extracted from each Ayla template associated with your OEM admin role.
- Click the Host MCU Images tab located at the top of the OTA landing page, as shown below.
- Click the image you wish to edit in Host Image File column of the table listing. This opens the View Host MCU Image dialog box, shown below:
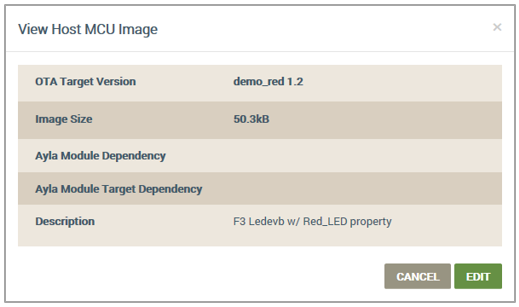
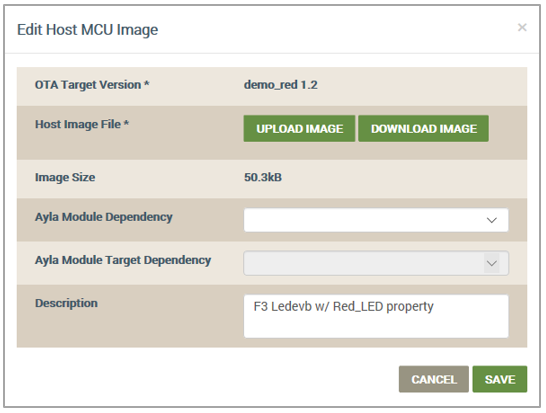
- Click EDIT to change the dialog box to Edit Host MCU Image, as shown below:
|
NOTE |
Fields with an asterisk (*) are mandatory to complete the configuration. The other fields are optional; therefore, leaving them blank does not have any effect. |
- In Host Image File (mandatory), click UPLOAD IMAGE to replace the current Host MCU image with a different one, or click DOWNLOAD IMAGE to back up this image in another location.
|
NOTE |
Image Size displays the size of the new Host MCU image file once it is uploaded. |
- For Ayla Module Dependency (optional), select the Ayla module that has the firmware that came with the Ayla device(s), which should receive this OTA update. Specifying the Ayla module dependency is important because the module may be changed over the lifecycle of a device.
|
NOTE |
The Ayla platform filters out all other modules except for the one you selected for Ayla Module Dependency, and then deploys the OTA update only to the devices with that particular Ayla module. This is an efficient way to send firmware updates to select devices. |
- For Ayla Module Target Dependency (optional), select the Ayla module firmware release/version to send to devices via this OTA update.
|
NOTE |
If you configure Ayla Module Dependency (in Step 8), you must also enter the version of the Ayla module firmware to deploy to those devices in the Ayla Module Target Dependency field. |
- In Description (optional), change the information for this new Host MCU image that you uploaded.
- Click SAVE to make your changes to the information for this Host MCU image in the table listing. Or click CANCEL to close this dialog box without saving.
How to get here on the dashboard: Click Intelligent OTA in the Navigation Panel.
See also: Ayla Intelligent OTA, Intelligent OTA: Host MCU OTAs tab, Access the Ayla Customer Dashboard, Default User Roles, User Roles for Access to Factory Actions, Ayla Platform OEM Type, Intelligent OTA: Device Error Codes, Intelligent OTA: Best Practices.
Please click here to let us know how we're doing. Thank you.